Sunday, June 30, 2013

How to redirect to Welcome page using conext root in ADF


Usecase : How to redirect to specific .jsp or .jspx page  just by typing a context root in ADF.
             For eg : http://localhost:7101/emp - By typing this in browser, I want to always redirect to to http://localhost:7101/emp/faces/jsp/emp/EmployeeHome.jspx

Solution: 
 - Create index.html page in Webcontent as shown below,  Provide the corresponding target URL in content attribute

Tuesday, June 25, 2013

How to use Tortoise SVN client to check-in & check-out

How to use Tortoise SVN client to check-in & check-out

Tortoise SVN is one of the most commonly tool used to perform CRUD(Create/Read/Update/Delete) operations against SVN repository

- After installing Tortoise SVN tool , By right clicking anywhere in any folder, You should see a menu as shown below. To checkout specific file/folder from SVN , Click on SVN Checkout menu item

- Below window will be displayed upon clicking 'SVN Checkout' from the above screenshot, Enter the SVN repository URL in 'URL of repository' field, Enter checkout directory ( where you want to copy file/folder from repository) , Click on 'Ok' button and This will copy all the files and folders from the SVN repository based on provided repository URL. In this example, I am checking out 'demo' folder from the repository. This folder can have sub folders or just only files, This will copy every sub folder/file from the given URL .

- Check for Modifications - Before check-in modified files locally, You need to ensure what are all the files modified, Follow below steps
- Right click on the folder , where you modified and want to check in , Choose Tortoise SVN->Check for modifications
- This will list you out all the modified files/newly added files/ deleted files in a window

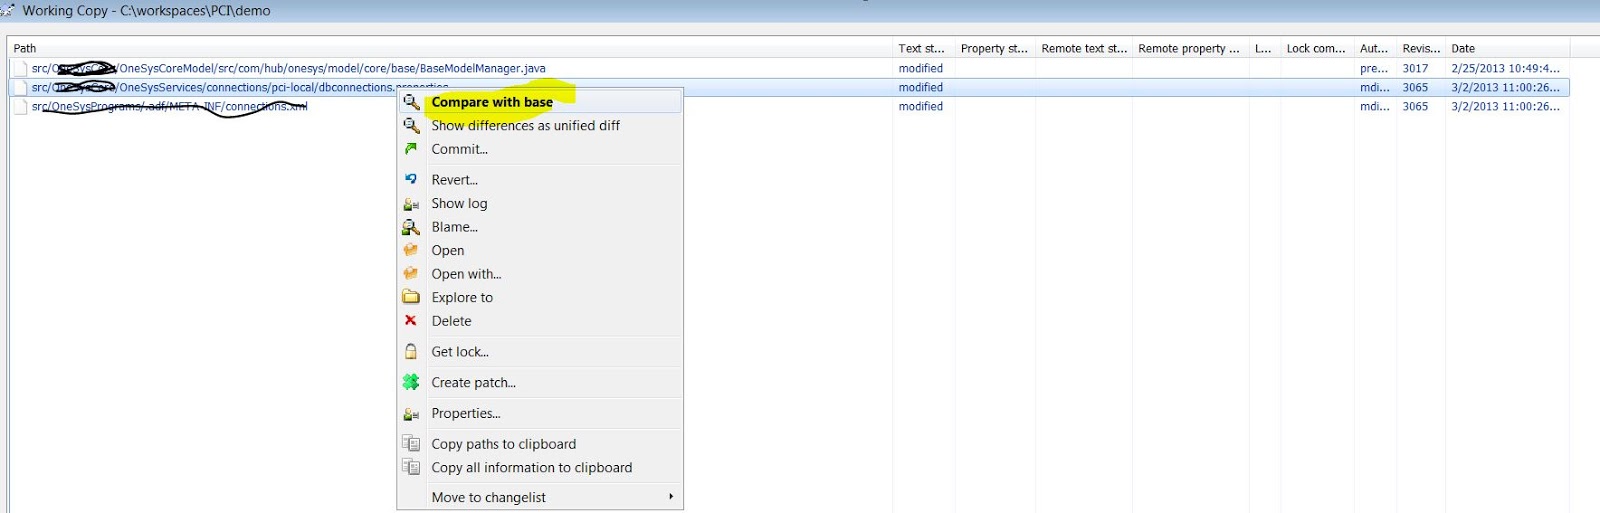
- This is how look like the Check for Modifications window, You can see what are all the files modified/deleted/newly added in this window.

- To compare with a base - Right click on the file which you want to compare, choose compare with base menu item, This will show you difference between base file and modified file. You can easily figure out what are all the changes you made

- To commit - To check-in the file , Once you are comfortable with all the changes made by you , next step is to check-in the file to repository , Right click on the file which you want to commit/check-in , Choose commit menu item, this will commit the modified file into svn repository

- To commit newly added file - Right click on the newly added file, Choose 'Add' menu item, then again right click on the newly added file, Choose 'Commit' menu item. this will commit the newly added file into repository.

- To Delete a file - Right click on the file(Explorer) view, Choose Tortoise SVN->Delete , After doing this , you will see this file in 'Check for modifications' window,  Right click on the file which you have deleted, then choose 'Commit' , This will permanently remove the file from repository

- To Revert - If you want to revert/undo all the changes you made locally, Then select the file in windows explorer view, Choose Tortoise SVN->Revert' , This will revert all the changes you made locally

- To Update - If you want to update latest code base from the SVN repository to your local folder, then right click on the file/folder, choose 'SVN Update' , This will update your local work space with all the latest content from the repository


For More Info
http://www.youtube.com/watch?v=wQHpNgMm_BU
http://www.youtube.com/watch?v=xhCXQMt32S4


Friday, June 21, 2013

How to get current logged In User information in ADF ?

How to obtain Logged In User information in ADF ?

Below are multiple ways how we can obtain the logged in User specific information in ADF
UI Layer
--------------------------
 #{securityContext.userName}

We can set default expression in view object attribute as below
----------------------------------------------------------------

adf.context.securityContext.getUserPrincipal().getName()
or
adf.context.securityContext.getUserName()

Java
-------------------
You can get User Name in Java code also using the following code.

     ADFContext adfCtx = ADFContext.getCurrent();
     SecurityContext secCntx = adfCtx.getSecurityContext();
     String user = secCntx.getUserPrincipal().getName();
     String _user = secCntx.getUserName();

How to get Logged in User ID in Application Module ?

String userName = this.getUserPrincipalName();

How to get Logged in User Roles  in Application Module ?

    List userRoles =
      Arrays.asList(ADFContext.getCurrent().getSecurityContext().getUserRoles());

Thursday, June 20, 2013

How to load the Resource Bundle based on client logged in Locale ?

How to load the Resource Bundle based on client logged in Locale ?


  /**
  * Load Resource Bundle based on client Locale
  **/
  private void loadBundle(Locale locale)
  {
    Map<Locale, PropertyResourceBundle> mBundles =
    new HashMap<Locale, PropertyResourceBundle>();
      synchronized(locale)
      {
        ClassLoader classLoader = Thread.currentThread().getContextClassLoader();
        PropertyResourceBundle bundle =
          (PropertyResourceBundle)PropertyResourceBundle.getBundle(sMessageBundleName, locale, classLoader);
        mBundles.put(locale, bundle);
      }
  }

How to Get the Client Locale in ADF Application

How to Get the Client Locale in ADF Application

/**
* Get the client Locale
**/
  public static Locale getLocale()
  {
    FacesContext ctx = FacesContext.getCurrentInstance();
    UIViewRoot uiRoot = ctx.getViewRoot();
    Locale locale = null;
    if (uiRoot != null)
    {
      locale = uiRoot.getLocale();
    }
    else
    {
      locale = FacesContext.getCurentInstance().getExternalContext().getRequestLocale();
    }
    return locale;
  }

Monday, June 17, 2013

How to access log files in Weblogic

How to access log files in Weblogic

Most of the times, In large scale environments, Weblogic application servers will be installed on linux machines. There are multiple ways we can access to log files to see application logging specific information or deployment log information.

One way is , Cd(Change directory) to corresponding log file folder in linux box and use linux commands to access the log files.

Another way is , connect to weblogic EM(Enterprise Manager) and follow below steps to see detailed log information.

- Connect to Weblogic Enterprise Manager
                 

-Expand Weblogic Doman, Right click on the corresponding cluster where your application has been deployed, Choose Logs , View Log Messages as shown below


- Select the log file as shown below
                                       

- Click on Download button as shown below to copy to local folder.


Saturday, June 15, 2013

How to build ADF UI components without using ADF Business Components


Usecase : How to build ADF UI components without using ADF Business Components

There is a way to build ADF UI components without using ADF Business components, For example if the application doesn't involve with any database transactions and all the UI components built on top of external data source, then we can eliminate use of business components and use simple POJO(Plain Old Java Objects) to build simple to Complex UI screens. Though we can use transient view object achieve similar functionality but requirement is totally eliminate use of business components (VO's , AM Impl) then below approach will workout very well

Implementation :

- Create a POJO with all the getter/setter properties for required attributes which need to be displayed on .jspx or .jsff

- Define a backing bean, Which holds the above defined POJO as a class level attributes with getter/setter properties.

- Drag the required UI components from the component pallet , and binds the each UI component value to backing bean. POJO properties.

- For eg : Define <af:table> component based on POJO , Remember we have to implement rangeSize, selectionListener,empListQueryListener operations

 <af:table value="#{pageFlowScope.EmpBean.empTable.tableRows}"
                          var="row"
                          rows="#{pageFlowScope.EmpBean.empTable.rangeSize}"
                          emptyText="#{pageFlowScope.EmpBean.empTable.emptyText}"
                          fetchSize="#{pageFlowScope.EmpBean.empTable.rangeSize}"
                          filterModel="#{pageFlowScope.EmpBean.empTable.filter}"
                          queryListener="#{pageFlowScope.EmpBean.empListQueryListener}"
                          varStatus="vs" partialTriggers="::refresh"
                          selectionListener="#{pageFlowScope.EmpBean.empTable.selectionListener}"
                          rowSelection="single" id="tEmp"
                          summary="Employee List" filterVisible="true"
                          selectedRowKeys="#{pageFlowScope.EmpBean.empTable.selectedRowKeys}">

- For eg : <af:inputText>

<af:inputText value="#{pageFlowScope.EmpBean.empPOJO.firstName}"
              readOnly="#{!pageFlowScope.EmpBean.displayReadOnly}"
              label="#{loadplanninguiBundle['COLUMN.FIRST_NAME_LABEL']}"
              id="it6">
</af:inputText>

-  With this approach, not required to create any data control as well.

Friday, June 14, 2013